C++單元測試(4) - 用VC6先試一下: 如何使用CppUnit
¶C++單元測試(4) - 用VC6先試一下: 如何使用CppUnit
原文連結: https://darkblack01.blogspot.com/2014/08/c3-vc6-cppunit.html
移植時的最後更新日期: 2015-12-23T14:16:57.722+08:00
接續前篇,因為暫時還不想換tool寫文章!^^
就繼續VC6的使用說明。
在這裡,我們為了要先測試一下編出來的檔案對不對。
就暫時先以CppUnit CookBook中範例的最終版本當sample code吧!
為了方便之後在VS2010上做測試,就先把VC6可以跑的code貼在這。
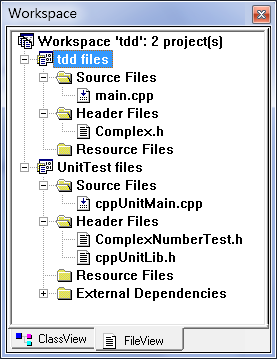
由於UnitTest是獨立在開發專案外的另一個專案。
所以,會在下面的圖中,看見兩個專案檔,這是正常,未來上手之後也都是這樣安排的。
(不然就不叫unit test了,就用條件編譯就好啦!)
專案檔與檔案之間的設定
先看專案檔與檔案之間的設定(此專案檔都是Win32 Console Application)
程式碼
接下來就是貼source code先複製到各個檔案上面。
main
#include <iostream>
#include "Complex.h"

using namespace std;

int main()
{
    Complex a(1, 3);
    Complex b(1, 3);
    Complex c = a + b;

    cout << c.real << endl;
    return 0;
}#ifndef COMPLEX_H
#define COMPLEX_H
class Complex
{
friend bool operator==(const Complex& a, const Complex& b);
friend Complex& operator+(const Complex &a, const Complex &b);
friend Complex& operator/(const Complex& a, const Complex& b);
public: //just for test
double real, imaginary;
public:
Complex( double r, double i = 0 ): real®, imaginary(i) { }
};
bool operator==( const Complex &a, const Complex &b )
{ return (a.real == b.real)&&(a.imaginary == b.imaginary); }
Complex& operator+(const Complex &a, const Complex &b )
{ return *(new Complex(a.real + b.real, a.imaginary + b.imaginary)); }
Complex& operator/(const Complex &a, const Complex &b )
{ return *(new Complex(a.real / b.real, a.imaginary / b.imaginary)); }
#endif#include “cppUnitLib.h”
#include “ComplexNumberTest.h”
#include <iostream>
int main()
{
CppUnit::TextUi::TestRunner runner;
CppUnit::TestFactoryRegistry ®istry = CppUnit::TestFactoryRegistry::getRegistry();
runner.addTest( registry.makeTest() );
runner.run();
return 0;
}#ifndef ComplexNumberTest_H
#define ComplexNumberTest_H
#include “cppUnitLib.h”
#include "…/Complex.h"
class ComplexNumberTest : public CppUnit::TestFixture
{
private:
Complex *m_10_1, *m_1_1, *m_11_2;
public:
void setUp()
{
m_10_1 = new Complex(10, 1);
m_1_1 = new Complex( 1, 1);
m_11_2 = new Complex(11, 2);
}
void tearDown()
{
delete m_10_1;
delete m_1_1;
delete m_11_2;
}
void testEquality()
{
CPPUNIT_ASSERT( *m_10_1 == *m_10_1 );
CPPUNIT_ASSERT( *m_10_1 == *m_11_2 );
}
void testAddition()
{
CPPUNIT_ASSERT( *m_10_1 + *m_1_1 == *m_11_2 );
}
void testDivideByZeroThrows()
{
*m_10_1 / Complex(0);
}
CPPUNIT_TEST_SUITE( ComplexNumberTest );
CPPUNIT_TEST( testEquality );
CPPUNIT_TEST( testAddition );
CPPUNIT_TEST_EXCEPTION( testDivideByZeroThrows, std::exception );
CPPUNIT_TEST_SUITE_END();
};
CPPUNIT_TEST_SUITE_REGISTRATION( ComplexNumberTest );
#endif#ifndef CPPUNIT_LIB
#define CPPUNIT_LIB
#include <cppunit/TestCase.h>
#include <cppunit/extensions/HelperMacros.h>
#include <cppunit/ui/text/TestRunner.h>
#include <cppunit/XmlOutputter.h>
#include <cppunit/CompilerOutputter.h>
#include <cppunit/TestResult.h>
#endif設定專案檔屬性
最後,再來設定專案檔,如何使用CppUnit的檔案。.h檔路徑
先設定要#include 的.h檔路徑 |
| 在Additional include directiories:中填上.h檔路徑 |
lib檔,檔案名稱及路徑
再設定link時期要找得到的lib檔,檔案名稱及路徑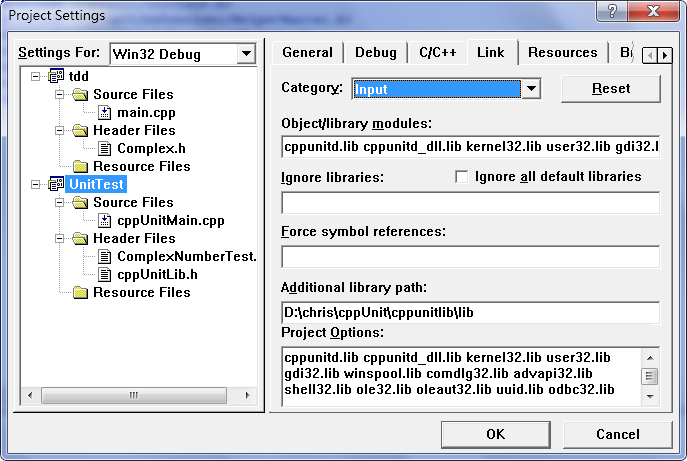 |
| 在Object/library modules: 中填入.lib檔的檔名 在Additional library path: 中填入.lib檔放置的路徑 |
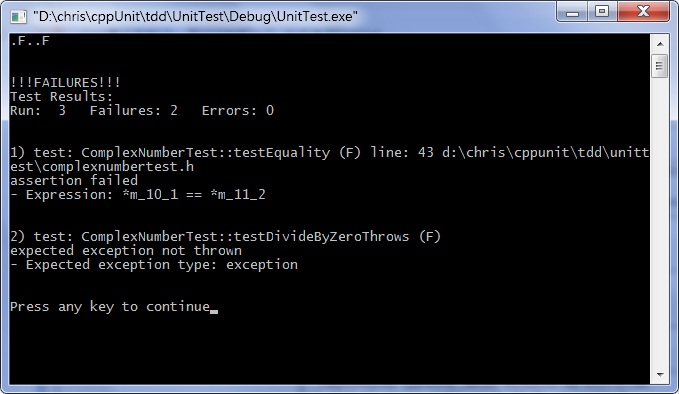
執行
設定UnitTest為Active Project就可以「以Unit Test為主」在IDE按下編譯→執行,就可以看見Unit Test的執行結果報告了!^^
發表於