Hexo 加上 gitalk
¶Hexo 加上 gitalk
看見一些朋友開始使用[1] gitalk。
覺得更貼近使用 github 功能做 blog 的精神。
接下來就參考官網[2]的步驟來做看看
要注意你自己的主題是不是
ejs做的
如果不是,就不適用官網的介紹。
2020/02/05 更新
因 GitHub 的授權政策修改。
Gitalk 的授權 token 要改成 access_token ,不使用 clientID/clientSecret 。
否則 GitHub 就灌爆你的信箱
若pull request 334 尚未合併,考慮採用臨時解決方案
臨時解決方案: 參考 https://github.com/gitalk/gitalk/issues/343#issuecomment-581758733
¶加上 CDN
引用 npm 的檔案
會自動轉換成最新版
<link rel="stylesheet" href="https://unpkg.com/gitalk/dist/gitalk.css">
<script src="https://unpkg.com/gitalk/dist/gitalk.min.js"></script>
臨時解決方案,使用網友改好的 js 檔。
<link rel="stylesheet" href="https://unpkg.com/gitalk/dist/gitalk.css">
<script src="https://geektutu.github.io/hexo-theme-geektutu/js/gitalk.min.js"></script>
可以貼上 theme 的模版。看看是不是要貼在 <head>
¶開啟 github 權限
舊版的做法,不要再這麼做了
直接去 Github > Profile > Settings Developer > settings > New OAuth App
填上
- Application name
- Homepage URL
- Application description
- Authorization callback URL
- Application name 可以任意填。
- Homepage URL 和 4. Authorization callback URL 都要輸入你的 blog 網址。
成功會看見這個畫面

直接去 Github > Settings > Developer settings > Personal access tokens
- 按下 「Generate new token」,進入新增 token 頁面
- 填上 Note,捲到最下面,直接按下「Generate token」[註1]
- 成功之後,複製 token,先存好,之後就看不到了,這就是 access token 囉。
註1: 沒錯,不用勾選任何勾勾就是 (no scope),等同於 read-only token
出處: https://developer.github.com/apps/building-oauth-apps/understanding-scopes-for-oauth-apps/#available-scopes
¶加上留言區
這裡要爬一下自己用的主題使用的模版語言。
要符合以下的邏輯
- 要渲染 post 的邏輯
- 該文章適合的位置(通常是最下面)加上語法
¶我自己的做法
themes/icalm/layout/post.ejs
找到 post 的渲染位置
加上渲染 comment 的引用。
<div>
  <%- partial('_partial/content-view', { post: page, isPage: false}) %>
  <%- partial('_partial/comment') %>
</div>
themes/icalm/layout/_partial/comment.ejs
可以發現我的 cdn 掛在這個位置,並不是所有頁面的 head
這一段初始化最後會渲染在 #gitalk-container 的位置
這是舊版的做法
<link rel="stylesheet" href="https://unpkg.com/gitalk/dist/gitalk.css">
<script src="https://unpkg.com/gitalk/dist/gitalk.js"></script>
<script type="text/javascript">
    var gitalk = new Gitalk({
        clientID: '<%= theme.gitalk.clientID %>',
        clientSecret: '<%= theme.gitalk.clientSecret %>',
        id: window.location.pathname,
        repo: '<%= theme.gitalk.repo %>',
        owner: '<%= theme.gitalk.owner %>',
        admin: '<%= theme.gitalk.admin %>',
        distractionFreeMode: '<%= theme.gitalk.on %>'
    })
    gitalk.render('gitalk-container')
</script>
加上 accessToken 的欄位。(打算從 _config.yml 讀進來)
目前先使用臨時解決方案的 js 檔。
<link rel="stylesheet" href="https://unpkg.com/gitalk/dist/gitalk.css">
<!-- <script src="https://geektutu.github.io/hexo-theme-geektutu/js/gitalk.min.js"></script> -->
<!-- 臨時解決方案 --> <script src="https://unpkg.com/gitalk/dist/gitalk.js"></script>
<script type="text/javascript">
    var gitalk = new Gitalk({
        accessToken: '<%= theme.gitalk.accessToken %>',
        id: window.location.pathname,
        repo: '<%= theme.gitalk.repo %>',
        owner: '<%= theme.gitalk.owner %>',
        admin: '<%= theme.gitalk.admin %>',
        distractionFreeMode: '<%= theme.gitalk.on %>'
    })
    gitalk.render('gitalk-container')
</script>
themes/icalm/layout/_partial/content-view.ejs
下面加入這一段
<% if (!isPage) { %>
    ...
    <section>
      <div id="gitalk-container"></div>
    </section>
<% } %>
判斷 !isPage 指的 page 不是內容頁,是 tag 或 categories 的這種引導頁面,用否定指的是「要找內容頁」。
在 hexo 內容頁通常叫
post
這裡還提供 #gitalk-container 的位置,也就是留言區在畫面的位置。
¶加 config 啟動 gitalk
在這加上 _config.yam 指的是 佈景主題裡的 config 檔。
加上這一段設定,在 ejs 中可以用 theme.gitalk.on 抓到 true
所以上面那一段初始化 javascript 的渲染現在才 work
這是舊版的做法
gitalk:
  on: true
  owner: dwatow
  repo: dwatow.github.io
  admin: ['dwatow']
  clientID: ...
  clientSecret: ...
  labels: ['Gitalk']
gitalk:
enable: post
on: true
owner: dwatow
repo: dwatow.github.io
admin: ['dwatow']
accessToken: ...
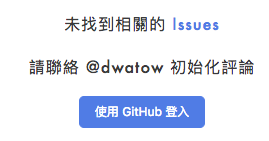
labels: ['Gitalk']¶驗證成功
如果你成功的話,可以在 hexo server 看見這樣的畫面,這樣再推上去都還來得及。
¶要注意的問題
在使用 gitalk 之後,hexo 的使用上就要注意檔名長度。
因為 github 的 issue labels 長度不可以超過 50 個字 如果超過就會無法留言!!