Google 的第三方登入 (web 前端實作)
¶Google 的第三方登入 (web 前端實作)
¶概念介紹
要實現第三方登入,有兩種方式
- 做在前端 ← 這一篇要講的是這個
- 做在後端
¶前端的第三方登入
兩者之間的差別在於,前端實作,不需要 redirect url 後端實作的話,需要。(慎選套件)
這一篇,介紹的是做在前端。
這次是要介紹如何妥善安排程式碼在 Vue 裡面。
¶設定
先到 Google 設定第三方登入的憑證
到這個頁面
- 如果畫面和我不一樣的話,請先開一個專案
- 我們要的功能在「憑證」裡面
- 在憑證裡面,建立一個「OAuth 用戶端 ID」允許第三方登入
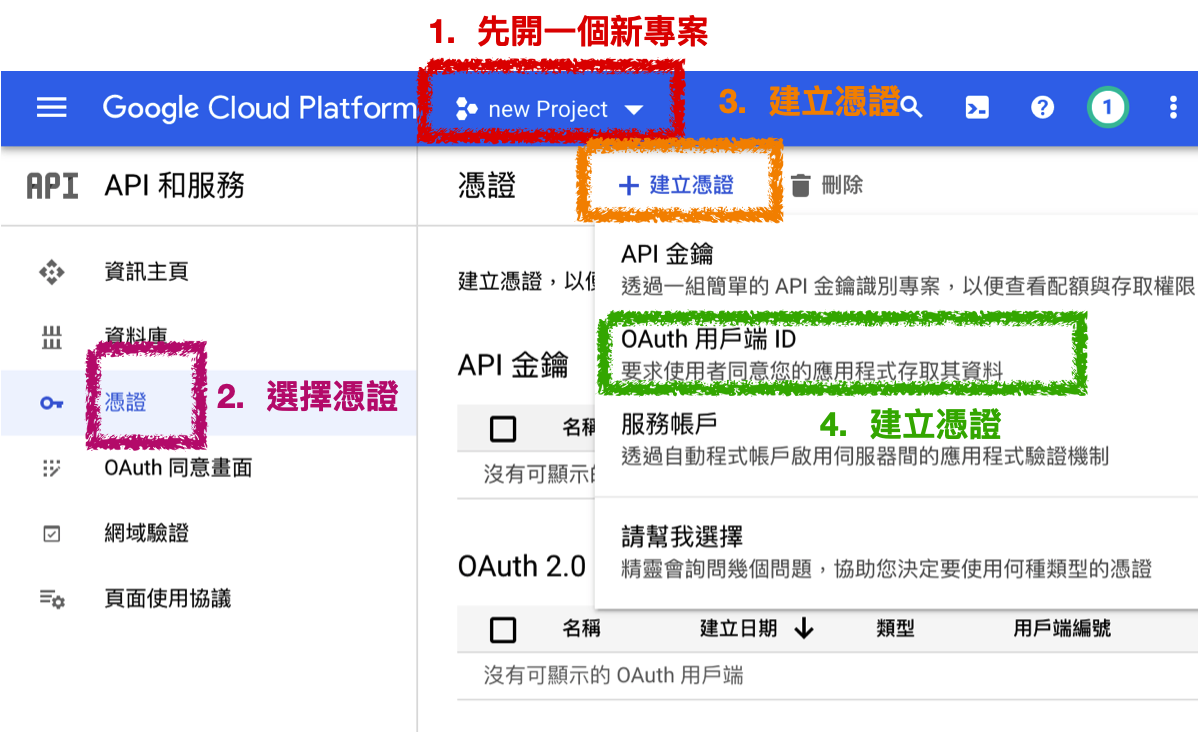
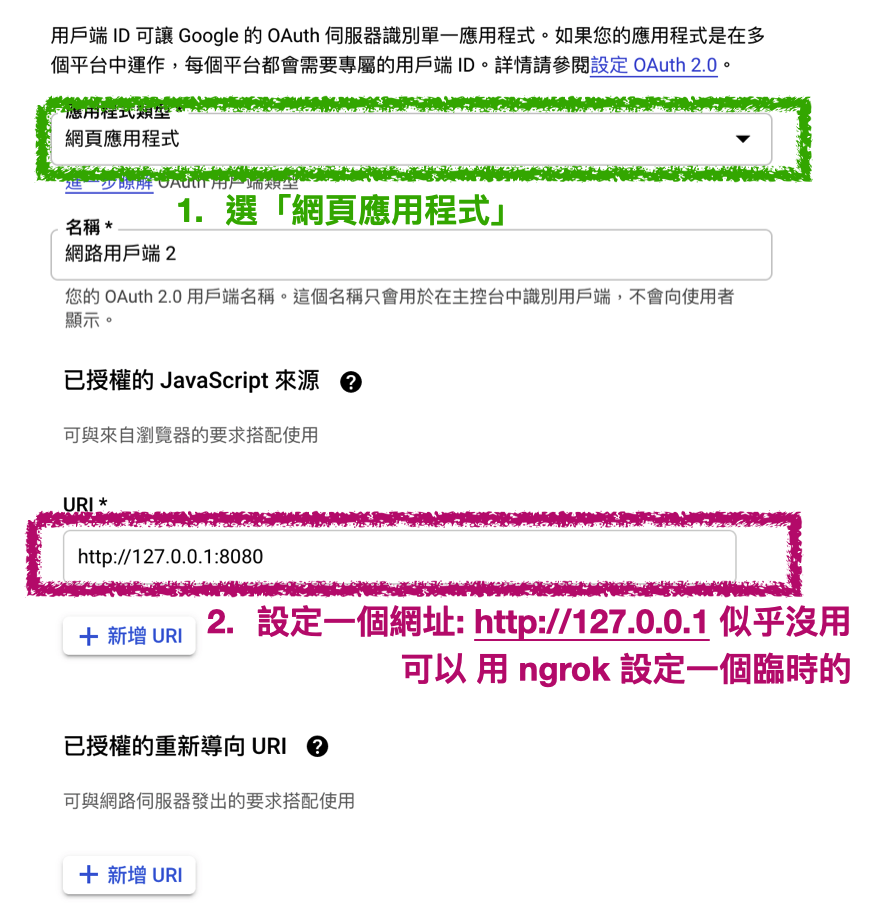
點擊 OAuth 用戶端 ID 之後
- 因為要要做的是 web 所以選「網頁應用程式」
- 設定 URI 可以用 ngrok 先用一個臨時的來測試。(在此就用
http://127.0.0.1:8080做代表) - 好了就按下「建立」
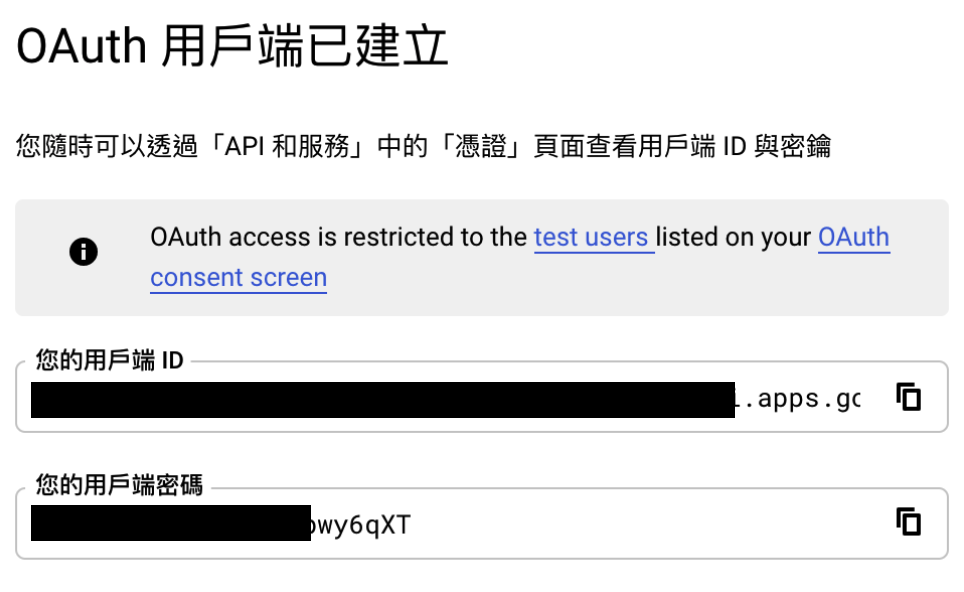
- 成功的時候,Google 就會提供用戶端 ID (clientId) 和用戶端密碼,我們只要 clientId
- 按下確定,就可以來實作程式囉
¶實作
public/index.html
需要載入 Google 的 SDK[1]
<script src="https://apis.google.com/js/platform.js" async defer></script>¶Google initial
在頁面初始的過程,需要在 gapi.load 時初始化或自動登入[2]
example code
var startApp = function() {
  gapi.load('auth2', function(){
    // Retrieve the singleton for the GoogleAuth library and set up the client.
    auth2 = gapi.auth2.init({
      client_id: 'YOUR_CLIENT_ID.apps.googleusercontent.com',
      cookiepolicy: 'single_host_origin',
      // Request scopes in addition to 'profile' and 'email'
      //scope: 'additional_scope'
    });
    attachSignin(document.getElementById('customBtn'));
  });
};
在 vue 上實作,必須將這一段放在 main.js 確保不管已登入,還是未登入,在每一次開啟頁面,都會正確初始化
import Vue from 'vue';
import App from './App';
import router from './router';

Vue.config.productionTip = false;

new Vue({
  created() {
    // Google Sign-in initial
    window.gapi.load('auth2', () => {
      window.gapi.auth2.init({
        client_id: 'YOUR_CLIENT_ID.apps.googleusercontent.com',
      });
    });
  },
  router,
  render: h => h(App)
}).$mount('#app');¶繪製 Button
可以使用 gapi.signin2.render 自訂義繪製時機點
example code
gapi.signin2.render('my-signin2', {
  'scope': 'profile email',
  'width': 240,
  'height': 50,
  'longtitle': true,
  'theme': 'dark',
  'onsuccess': onSuccess,
  'onfailure': onFailure
});
src/components/googleSigninButton.vue
直接將 google sign-in button 做成一個按鈕。
並且在 mounted 時繪制
Note
用 <div class="g-signin2" data-onsuccess="onSignIn"></div>
這種內建的方式繪製,它只會在網頁初始時繪製按鈕。
但是登出時會出問題:
按下登出後,會跳轉到登入頁,照理需要繪製登入按鈕
因為這並不是在初始過程,所以不會繪製。
登入 method 的綁定方式,要配合 Google API 的做法
在此,目的是為了傳給後端 id_token 所以輸出只 emit 出 id_token 而已。
這部份可以依需求修改。
<template>
  <div>
    <div id="google-sign-in-button"></div>
  </div>
</template>

<script>
export default {
  name: 'GoogleSignInButton',
  props: {
    width: {
      type: String,
      default: null
    },
    height: {
      type: String,
      default: null
    }
  },
  mounted() {
    window.gapi.signin2.render('google-sign-in-button', {
      scope: 'profile email',
      width: this.width,
      height: this.height,
      longtitle: true,
      theme: 'light',
      onsuccess: this.signIn,
      onfailure: () => {}
    });
  },
  methods: {
    signIn(googleUser) {
      const id_token = googleUser.getAuthResponse().id_token;
      this.$emit('sign-in', id_token);
    }
  }
};
</script>
使用 GoogleSignInButton component
<template>
  <div>
    <GoogleSignInButton @sign-in="oAuthSignIn('google', $event)"></GoogleSignInButton>
  </div>
</template>

<script>
import GoogleSignInButton from '@/components/GoogleSignInButton';

export default {
  name: 'AuthSignin',
  components: {
    GoogleSignInButton
  },
  methods: {
    async oAuthSignIn(provider, id_token) {
      try {
        await this.$store.dispatch('oAuthLogin', {
          provider,
          id_token
        });
        this.$emit('submit');
      } catch (error) {
        console.error(error);
      }
    }
  }
};
</script>¶登出
若你想要在登出時,同時斷開使用者給予的授權,就可以增加這一段。[3]
example code
<a href="#" onclick="signOut();">Sign out</a>
<script>
  function signOut() {
    var auth2 = gapi.auth2.getAuthInstance();
    auth2.signOut().then(function () {
      console.log('User signed out.');
    });
  }
</script>
src/views/navigation.vue
<template>
  <div class="shadow">
    <botton @click="Logout">登出</botton>
  </div>
</template>

<script>
export default {
  name: 'Navigation',
  methods: {
    async Logout() {
      try {
        const isLogout = window.confirm('確定要登出');
        if (isLogout) {
          const auth2 = window.gapi.auth2.getAuthInstance();
          auth2.signOut().then(() => {
            console.log('Google User signed out.');
          });
          // 可以在這個時候移除 cookie
          window.alert('已登出');
          this.$router.push({ name: 'Signin' }); // 回到登入頁
        }
      } catch (error) {
        if (error instanceof Error) {
          window.alert(error.messages);
        } else {
          window.alert(error.detail);
        }
      }
    }
  }
};
</script>

<style lang="scss" scoped>
</style>