用 Vue 包一個 Form Component
¶用 Vue 包一個 Form Component
這一篇包 Component 的前置知識,要先看一下鐵人賽的 Vue.js 進階心法
看完之後,在前端框架自訂 Component 的問題上,會類似「自定義型別」或「抽象資料型」的這種思考上。[1]
先了解到前端在處理資料時,在 Vue 官網教學上,其實學到了處理簡單型別的資料處理方式,將簡單型別透過 v-model 綁在畫面上的位置,就可以同時顯示資料,也編輯資料。
簡真實案例,可以說就是在處理 Object 與 Array 的問題,並不只是簡單型別而已。雖然可能可以將 Object 拆解成很多簡單型別進行各別欄位綁定來解決問題,但是本篇的思路並不會這樣走,希望可以保有物件型別的概念來處理問題。
¶Form = 編輯 Object 的界面
第一個想法,就是處理 Object 的編輯問題,就是要請出 Form 當作編輯的界面。
如何設計一個好的 Form Component 就成為了這一篇文章的重點。
在讀 code 上會有更多的資訊可以讀,也希望在界面上有更多的隱喻可以了解實作。
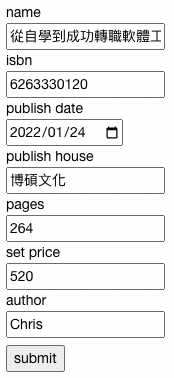
以這個物件為例,這是一個「書籍」的物件,裡頭的型別包含字串與數字。這是一個「抽象資料型別」,現在拿出紙筆畫一下,如果要將它變成表單,你會怎麼做呢?。
{
  "name": "從自學到成功轉職軟體工程師",
  "isbn": "6263330120",
  "publish_date": "2022-01-24",s
  "publish_house": "博碩文化",
  "pages": 264,
  "set_price": 520,
  "author": "Chris"
}
用原生的 form 表示,畫面就如同這樣。
那如果我們要用 vue 來寫要怎麼做呢?
¶尚未自己包 Component
照官網的做法,應該會選用 v-model 綁定欄位
/src/views/Document.vue
<form action="">
  <label>
    <div>name</div>
    <input
     name="name"
     type="text"
     v-model="form.name" />
  </label>
  <label>
    <div>isbn</div>
    <input
     name="isbn"
     type="text"
     v-model="form.isbn" />
  </label>
  <label>
    <div>publish date</div>
    <input
     name="publish_date"
     type="date"
     v-model="form.publish_date" />
  </label>
  <label>
    <div>publish house</div>
    <input
     name="publish_house"
     type="text"
     v-model="form.publish_house" />
  </label>
  <label>
    <div>pages</div>
    <input
     name="pages"
     type="number"
     v-model="form.pages" />
  </label>
  <label>
    <div>set price</div>
    <input
     name="set_price"
     type="number"
     v-model="form.set_price" />
  </label>
  <label>
    <div>author</div>
    <input
     name="author"
     type="text"
     v-model="form.author" />
  </label>
  <div style="margin-top: .5em">
    <button type="submit">submit</button>
  </div>
</form>¶設計 Form 元件
包成 Component 之後。
/src/views/Document.vue
template
<div style="padding: 50px">
  <BookForm :data="form">
    <button type="submit">submit</button>
  </BookForm>
</div>
script
維持資料在 view 決定的角度來設計 component,讓 BookForm 成為 pure component
import { ref } from 'vue';
import BookForm from '@/components/BookForm.vue';

const form = ref({
  "name": "從自學到成功轉職軟體工程師",
  "isbn": "6263330120",
  "publish_date": "2022-01-24",
  "publish_house": "博碩文化",
  "pages": 264,
  "set_price": 520,
  "author": "Chris"
})
/src/component/BookForm.vue
template
<form action="">
  <label>
    <div>name</div>
    <input
     name="name"
     type="text"
     v-model="props.data.name"/>
  </label>
  <label>
    <div>isbn</div>
    <input
     name="isbn"
     type="text"
     v-model="props.data.isbn"/>
  </label>
  <label>
    <div>publish date</div>
    <input
     name="publish_date"
     type="date"
     v-model="props.data.publish_date"/>
  </label>
  <label>
    <div>publish house</div>
    <input
     name="publish_house"
     type="text"
     v-model="props.data.publish_house"/>
  </label>
  <label>
    <div>pages</div>
    <input
     name="pages"
     type="number"
     v-model="props.data.pages"/>
  </label>
  <label>
    <div>set price</div>
    <input
     name="set_price"
     type="number"
     v-model="props.data.set_price"/>
  </label>
  <label>
    <div>author</div>
    <input
     name="author"
     type="text"
     v-model="props.data.author"/>
  </label>
  <div style="margin-top: .5em">
    <slot></slot>
  </div>
</form>
script
挖一個 props 先讓資料進來
const props = defineProps({
  data: {
    type: Object,
    required: true
  }
})
現在有兩個方向
- 維持 v-model
- 維持 props: data
¶維持使用 v-model
那就是要改變 props
/src/views/Document.vue
template
<div style="padding: 50px">
  <BookForm
    :name="form.name"
    :isbn="form.isbn"
    :publish_date="form.publish_date"
    :publish_house="form.publish_house"
    :pages="form.pages"
    :set_price="form.set_price"
    :author="form.author"
  >
    <button type="submit">submit</button>
  </BookForm>
</div>
script
(不變)
/src/component/BookForm.vue
template
<form action="">
  <label>
    <div>name</div>
    <input
     name="name"
     type="text"
     v-model="props.name" />
  </label>
  <label>
    <div>isbn</div>
    <input
     name="isbn"
     type="text"
     v-model="props.isbn" />
  </label>
  <label>
    <div>publish date</div>
    <input
     name="publish_date"
     type="date"
     v-model="props.publish_date" />
  </label>
  <label>
    <div>publish house</div>
    <input
     name="publish_house"
     type="text"
     v-model="props.publish_house" />
  </label>
  <label>
    <div>pages</div>
    <input
     name="pages"
     type="number"
     v-model="props.pages" />
  </label>
  <label>
    <div>set price</div>
    <input
     name="set_price"
     type="number"
     v-model="props.set_price" />
  </label>
  <label>
    <div>author</div>
    <input
     name="author"
     type="text"
     v-model="props.author" />
  </label>
  <div style="margin-top: .5em">
    <slot></slot>
  </div>
</form>
script
props 要改成很多個
const props = defineProps({
  name: {
    type: String,
    required: true
  },
  isbn: {
    type: String,
    required: true
  },
  publish_date: {
    type: String,
    required: true
  },
  publish_house: {
    type: String,
    required: true
  },
  pages: {
    type: Number,
    required: true
  },
  set_price: {
    type: Number,
    required: true
  },
  author: {
    type: String,
    required: true
  }
})
修改值會出現這個問題
[Vue warn] Set operation on key “name” failed: target is readonly.
加上 emit 與 computed get/set[2]
script
const emits = defineEmits([
  'update:name',
  'update:isbn',
  'update:publish_date',
  'update:publish_house',
  'update:pages',
  'update:set_price',
  'update:author',
])

const name = computed({
  get() {
    return props.name
  },
  set(newValue) {
    emits('update:name', newValue)
  }
})
const isbn = computed({
  get() {
    return props.isbn
  },
  set(newValue) {
    emits('update:isbn', newValue)
  }
})
const publish_date = computed({
  get() {
    return props.publish_date
  },
  set(newValue) {
    emits('update:publish_date', newValue)
  }
})
const publish_house = computed({
  get() {
    return props.publish_house
  },
  set(newValue) {
    emits('update:publish_house', newValue)
  }
})
const pages = computed({
  get() {
    return props.pages
  },
  set(newValue) {
    emits('update:pages', newValue)
  }
})
const set_price = computed({
  get() {
    return props.set_price
  },
  set(newValue) {
    emits('update:set_price', newValue)
  }
})
const author = computed({
  get() {
    return props.author
  },
  set(newValue) {
    emits('update:author', newValue)
  }
})
最後再改一下外部使用方式,維持 v-model 的做法
/src/views/Document.vue
template
<BookForm
  v-model:name="form.name"
  v-model:isbn="form.isbn"
  v-model:publish_date="form.publish_date"
  v-model:publish_house="form.publish_house"
  v-model:pages="form.pages"
  v-model:set_price="form.set_price"
  v-model:author="form.author"
>
  <button type="submit">submit</button>
</BookForm>
優點:
- 在 template 優雅使用的
v-model處理雙向綁定。 - 可以在「使用時」透過界面的設計看得出編輯的欄位有幾個。
缺點:
- 一個欄位就要有一組的 writable computed + props + emits 重複的程式有點多,需要多行編輯才不會有負擔。
¶維持 props: data (我自己偏好這樣做)
如果你對另一種做法感到好奇,首先要先了解 v-model 可以拆開寫。[3]
所以,為了解決「無法直接修改 props」的 warning,要先將 v-model 改寫成拆開的寫法
[Vue warn] Set operation on key “name” failed: target is readonly.
以 name 欄位為例,v-model 拆成 :value + @input 並且使用 $event 作為新值的變數。
由於在原生的元件上的 v-model 所以
$event要再.target.value才是輸出的值。
<input
 name="name"
 type="text"
 :value="props.data.name"
 @input="props.data.name = $event.target.value"
/>
再將 @input 裡面改寫成使用 emits 將值往外丟,就完成 BookForm 雙向綁定的任務。
<input
 name="name"
 type="text"
 :value="props.data.name"
 @input="emits('update:name', $event.target.value)"
/>
在這樣的寫法上,可以省去寫一組 computed-get/set 的工。
¶輸出/輸入型別相同
改到目前還有一點需要注意的,就是我們的目的是要修改原本資料的位置。
重點並不是傳出新的值,而是修改到相同的位置。(所以要回傳的是原本的物件)
接下來要改一下 emits 回傳出去的東西
<input
 name="name"
 type="text"
 :value="props.data.name"
 @input="emits('update:name', {
   ...props.data,
   name: $event.target.value
 })"
/>
這樣的寫法,可以避免修改的複雜度傳到外面去。
通常「怎麼修改」的這種 setter 概念的邏輯,是需要被重複使用的。
最後看一下最後的版本(改得不多)
/src/component/BookForm.vue
template
<form action="">
  <label>
    <div>name</div>
    <input
     name="name"
     type="text"
     :value="props.data.name"
     @input="emits('update:name', {
       ...props.data,
       name: $event.target.value
     })"
    />
  </label>
  <label>
    <div>isbn</div>
    <input
     name="isbn"
     type="text"
     :value="props.data.isbn"
     @input="emits('update:isbn', {
       ...props.data,
       isbn: $event.target.value
     })"
    />
  </label>
  <label>
    <div>publish date</div>
    <input
     name="publish_date"
     type="date"
     :value="props.data.publish_date"
     @input="emits('update:publish_date', {
       ...props.data,
       publish_date: $event.target.value
     })"
    />
  </label>
  <label>
    <div>publish house</div>
    <input
     name="publish_house"
     type="text"
     :value="props.data.publish_house"
     @input="emits('update:publish_house', {
       ...props.data,
       publish_house: $event.target.value
     })"
    />
  </label>
  <label>
    <div>pages</div>
    <input
     name="pages"
     type="number"
     :value="props.data.pages"
     @input="emits('update:pages', {
       ...props.data,
       pages: $event.target.value
     })"
    />
  </label>
  <label>
    <div>set price</div>
    <input
     name="set_price"
     type="number"
     :value="props.data.set_price"
     @input="emits('update:set_price', {
       ...props.data,
       set_price: $event.target.value
     })"
    />
  </label>
  <label>
    <div>author</div>
    <input
     name="author"
     type="text"
     :value="props.data.author"
     @input="emits('update:author', {
       ...props.data,
       author: $event.target.value
     })"
    />
  </label>
  <div style="margin-top: .5em">
    <slot></slot>
  </div>
</form>
script
也要寫一組和另一個寫法一模一樣的 emits
const props = defineProps({
  data: {
    type: Object,
    required: true
  }
})

const emits = defineEmits([
  'update:name',
  'update:isbn',
  'update:publish_date',
  'update:publish_house',
  'update:pages',
  'update:set_price',
  'update:author',
])
最後再改一下外部使用方式
/src/views/Document.vue
template
在此 BookForm 的輸入是「書籍」這樣的物件。輸出也是「書籍」的物件。
<BookForm
  :data="form"
  @update:name="form = $event"
  @update:isbn="form = $event"
  @update:publish_date="form = $event"
  @update:publish_house="form = $event"
  @update:pages="form = $event"
  @update:set_price="form = $event"
  @update:author="form = $event"
>
  <button type="submit">submit</button>
</BookForm>
優點:
- 可以在「使用時」透過界面的設計看得出編輯的欄位有幾個。
- 一個欄位的修改,只需要寫 emits ,並且同時組合成相同的物件。
- 外部使用可以直接撰寫,不用由實作決定
$event是什麼。
缺點:****
- 沒有使用的
v-model處理雙向綁定,將 v-model 拆開寫,需要注意怎麼拆。
¶最後
對於畫面的修改邏輯、與排版方式都可以封裝在 component 是基本的要求。
而在這個範例中,兩個版本對於物件的修改行為,都做到 component 上面了。
只是核心概念不太一樣,最後實作的方式也就不太一樣。
基於排版邏輯封裝的結果,將排版方式與資料處理動作綁在同一個 component 看起來是可以增進工程師理解程式碼層次的好方法。
希望可以找到屬於你自己面對前端時,最佳解決處理資料與畫面的方案。